Permissions and Authorization
This section outlines how you can configure user-based restrictions in your Lucy models and user interfaces.
Understanding how Authorization works in Lucy
So lets quickly go through how Lucy decides if a user is authorized to access a resource. [1]
Each user is assigned to a user group.
A user group defines that particular user’s function in iviva.
Each user group has a collection of user roles in it - one user role for each iviva Application.
So each user group will have one user role for the Asset app, and another user role for the Location app, etc...
These user roles are defined within the individual applications and describes what type of access the user is permitted within that particular application.
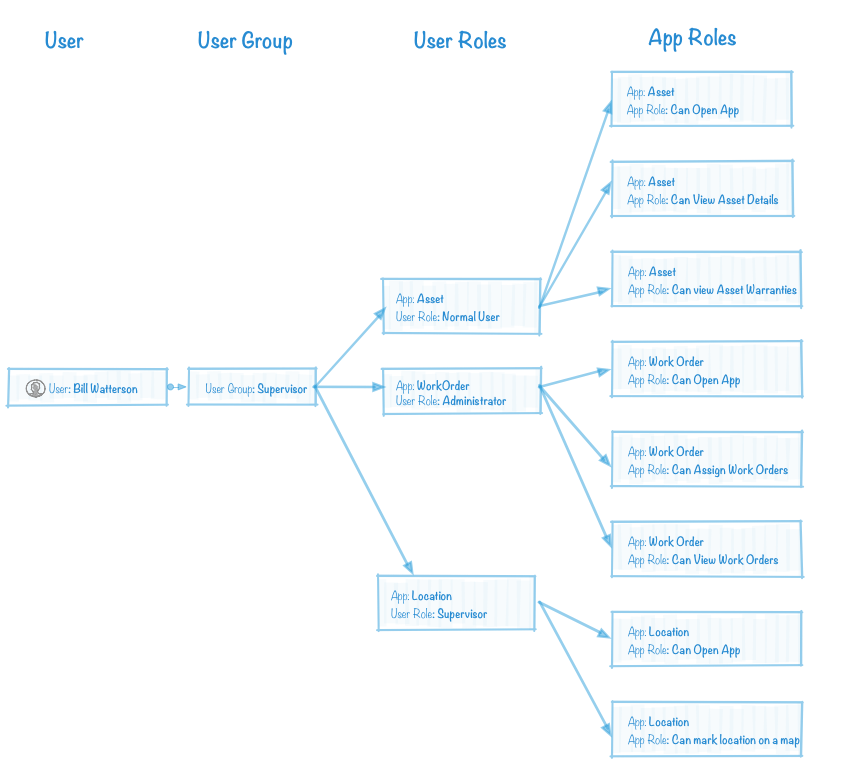
Each user role within the application is defined as a collection of app roles.
These app roles describe fine-grained permissions to do various things.
For example, one app role in the Asset application may be allowed to view warranty details.
This app role must be enabled for a user to be able to access the Asset Warranty Details screen in iviva.
An example of an app role in the Work Order application may be allowed to assign work order. Users who have this app role can assign work orders to technicians.
As you can see, app roles tend to be specific to that application’s domain.
Defining App Roles for Models
You can define fine-grained app roles for your models. In each model, go to the Permissions sidebar panel of the Model Designer. There, you can add app roles for that model. Some example app roles
Here, we’ve defined four roles. Two related to turning on and off a light, and two related to reading a light bulb configuration and modifying a light bulb configuration.
Once we have these roles, we need to do two things:
- Apply these roles to our actions and screens
- Assign these roles to various users.
Applying Roles to Actions
You can define a set of app roles that are allowed to execute an action by specifying them in the Action Start block of an action. Click on the block and then in the properties panel, find the section called Permissions.
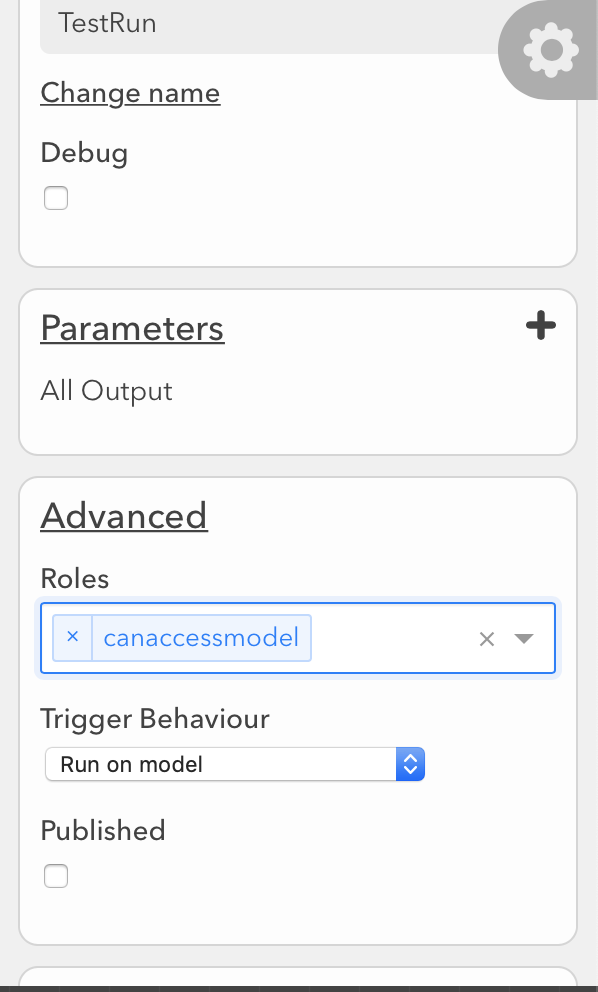
Here, you can see a comma separated list of roles that have been assigned to the action. Click on the  icon to view the full list of available roles where you can turn on and off the roles you want to use for the action.
Tip
If you just recently edited the roles list in the Permissions tab, then you may need to hit the reload icon to refresh the list in the dialog.
If you select multiple roles, then the user executing the action must have any one of them in order to execute the action.
Note
What happens if the user does not have the required roles? When executing an action, an error will be returned.
Warning
If an action is designed to be called by a scheduler or a workflow, then its very likely that the calling component will not have any application roles attached to it. So you need to make sure you don’t assign roles to these actions.
How does iviva know which user executed an action?
When an action is called via a user interface, then the user who is logged-in at that time will be considered as the user who executed an action. This applies even to any background tasks that are occurring on a web page that the user is looking at.
When the action is invoked via an API call, then the user associated with the API Key that was passed will be used to determine permissions.
Applying Roles to User Interfaces
For dynamically generated user interfaces, roles can be applied to them from the UI tab of the Model Designer.
Under each section, you can see a list of roles that have been applied for that interface. To change them, click the icon next to the header where it says Roles and then choose the required roles from a list.
If you select multiple roles, the user needs to have any one of them to access the screen.
If you are defining your own custom user interface, then you need to specify an experssion in the UI Composer, in the Permissions section of the UI screen configuration. See Applying Permissions to User Interfaces for more information.
Note
When specifying roles in actions and dynamically generated UIs, you can only select roles within the current model. Custom UIs can specify roles in any model, using iviva Expression.
Assigning App Roles to user roles
Alright, so you defined your app roles and have used them in your models and user interfaces.
Now you need to actually assign these roles to users so that they can access these actions and screens.
To do that, you need to assign your app roles to one of the user roles defined in the Lucy app.
To assign your app roles to user roles
- Go to the
Lucydashboard- Click the
icon to open the menu
- Click User Roles from the list
In the User Role screen, you can see a list of all user roles that have been define in the Lucy application.
Click on any one of them to see a list of app roles in the Lucy app.
Some of these are specific to operating Lucy (like roles related to restricting access to the model designer).
At the end of the list, you will be able to see all the app roles that are defined in models. These roles have a [<Model Name>] prefix in front of them to help you see which model the role is defined in.
Check-off the ones you want and assign them to the user role.
User Groups
Now, the user roles defined in the Lucy app can now be assigned to a user group and any user in that group will inherit these roles.
Consult your iviva documentation for information on managing user groups.
Tip
While designing and testing, you may often add/remove app roles to the user role defined for your own login. For these to take affect, you need to logout and login again.
Footnotes
| [1] | A resource could be an action to execute or a user interface to access |