Web Service Connector Toolkit
Connecting to RESTful APIs is a common use case in building integrations. Lucy comes with some connectors to popular cloud services out of the box, but more importantly, you are also provided with the tools to easily configure your own connectors.
If the external service you need to connect to publishes an HTTP-based API and uses any of the supported authentication schemes, you could probably configure your own connector for it. The supported authentication schemes are:
- Basic authentication
- OAuth 2 with Authorization Grant Flow (3-legged auth flow)
- API Key - In this case, the web service expects a single auth token or ‘key’ to be passed in some way when making the request
Here’s how it works:
- Define a WebService - this is the application to which you want to connect
- Configure the type of authentication it uses.
- Add methods to the web service - one for each API that the application exposes
- Create Accounts for the web service - these accounts contain specific credentials for calling the service. These can be configured either from the web service screen or from the Model Designer within the block itself. You can have multiple accounts and choose one when actually running the connector.
In the Model Designer, in the blocklist you’ll find a new group for your webservice and separate blocks for each method.
Lets look into it in detail:
Defining a new Web Service
From the Lucy dashboard, go to the  menu and under
 Web Service Connectors choose Create.
Give a name for your web service and save it. This will typically be the name of the application you are connecting to.
You will then be taken to the web service connector’s screen.
You can access this screen by selecting View under Web Service Connectors and searching for your web service.
Tip
You can also specify an icon for your web service. This makes it easier to identify in a action sequence. You need to host the icon somewhere and specify the url in the web service configuration.
Setting up authentication details
From the web service screen, you can start configuring your web service.
The first thing you need to do is specify how authentication works.
Click the  at the top to go to edit mode and change the Authentication Type.
There are three authentication types to choose from:
at the top to go to edit mode and change the Authentication Type.
There are three authentication types to choose from:
Basic Authentication
Use this if the web service uses Basic Auth. When registering accounts you will be prompted for a user name and password. These will be sent wih the web service in the Authorization header automatically.
OAuth 2
Use this if the web service supports OAuth2. You will need to specify the default OAuth 2 settings for the web service. From the sidebar of the web service screen, click ‘Global OAuth Settings’ to configure details for the web service.
You will need to fill in the following:
- Client ID
- Client Secret
- Authorization Url - the url to which users will go to authenticate themselves when setting up the connector
- Token Url - the url to be called to obtain an access token
- Scopes - a list of scopes that are required by the connector. When deciding what scopes to request, make sure you request the minimal set of scopes that work with all the methods you have defined in your web service.
Once this is done, you can start registering accounts. When registering a new account you will be taken to the authorization screen in the respective 3rd party application. Lucy will automatically keep track of your access token and refreh token and refresh it when appropriate.
The access token is available as a variable called #{access_token}.
Tip
In mose cases, web services that use OAuth 2 will pass the access token in the authorizaton header in the format:
Authorization: Bearer #{access_token}. You can configure this custom header for each web service method.
Custom Authentication
Use this if the service you’re trying to connect to uses a API Key to connect.
When this authentication method is setup, you will be prompted to specify the API Key when registering a new account for the web service.
You can then use #{apikey} as a placeholder in your method definitions to define where it should be inserted in the request.
Web Service Method Definitions
Now that you have setup your web service name and authentication information, you can start adding methods. Methods show up as individual blocks that you can drop into your action sequence at any point to execute that method. Each method has a name, and a method definition. The method definition consists of specifying how the HTTP request should be formulated. You can specify the url to use, what HTTP Method to use, what headers to pass, what body to pass and optionally, how to process the reponse.
Adding a method
To add a new web service method, click the  in the _Methods_ section of the UI.
You will be prompted to enter a name for your method. This will be the name that appears in the block in Lucy.
You can also give the url for the web service end point and what HTTP Method to use.
See the next section on how to specify the url.
in the _Methods_ section of the UI.
You will be prompted to enter a name for your method. This will be the name that appears in the block in Lucy.
You can also give the url for the web service end point and what HTTP Method to use.
See the next section on how to specify the url.
Click the Add button to save the web service method. You can now see a new item added to the _Methods_ section in the UI.
You can click the to edit the web service method.
Specifying the URL and HTTP Method
When specifying the end point for the web service, you need to give the full url including the https prefix.
You can also specify variables in the url.
Note
Plain http end points are also supported though obviously not recommeended.
Editing Headers
When you edit the method definition, in the second tab, you can edit the headers that need to be sent.
Click the to add a new header. You need to specify a header name and a header value.
Note that you can use variables in header names and values.
Note
You need to explicitly specify most headers including Content-Type.
Typically your content type would be either Content-Type: application/json or Content-Type: application/x-www-form-urlencoded.
When you use Basic authentication, the Authorization header is added automatically. In other authentication types, the Authorization header needs be explicitly added where required.
The Content-Length header will be set automatically. You should not specify that.
Query String Parameters
Query string parameters get appended to the end of urls. You can specify them as separate key/value pairs.
This is done in the third tab of the method definition dialog.
Click the icon to add a new pair. Give the name and then in the table, edit the value.
You can use variables in either names or values of query string parameters.
Defining the body format
You need to specify how the payload (if any) is sent to the web service. You can currently speecify them in two ways:
- Raw - you provide the raw body here. You can use variables in the body in places where user input has to come.
2. Key/Value Pairs - this is a helper that lets you easily specify key/value pairs when the body is expected in application/x-www-form-urlencoded format.
You can add a list of keys and corresponding valuesl You can use variables in both the keys and values.
Tip
Sometimes if the payload is complex, it may be easier to just give a single variable in the raw payload - #{Payload} and use your Lucy model to craft the actual payload and send the whole thinng as input to the method.
Using placeholders in the method definitions
Certain parameters for the web service will have to be provided by the user when they are using the web service.
For inputs that the user has to provide, you can use variables in your method definition.
As in other areas in Lucy, variables follow the #{variable} syntax by wrapping them in #{ and }.
Certain variables are provided by the system for you. Except for those names, you can use any name you want for variables.
You can specify variables in the following places:
- Anywhere in the url end point
- Header Name
- Header Value
- Body (raw or in the key and value for key/value pairs)
- Query String Keys
- Query String Values
When you save your method definition, all variables that you have used are extracted and made available as inputs to the block in Lucy.
The following variables are made available to you by default:
Parsing Outputs
Typically the full response from the web service call is made available as an output in your block called ‘Output’
However, if the output from the web service is JSON, you can choose to extract values out of it and make it avaialble as individual pins.
For example, if you’re building a connector to Salesforce, the id property from the JSON result may be extracted and presented in the block as an output called ‘ID’.
Which can be directly used by the action sequence without having to parse it first.
To do this, go to the Output tab in the method definition dialog and then change the type from Raw to Key/Value Pairs. Then add multiple items - one for each output you want to extract. Specify a name for the output parameter and add it. This is the name that will appear on the output pin in the block. For the Value, you need to specify a JSONPath expression that will define how to extract the value from the JSON that came out of the web service response.
Tip
For more information on JSON Path expressions, see http://jsonpath.com
See also
For example, if the output from your web service is:
You may want to extract 3 outputs:
Error Handling
Any 2xx response is considered successful.
Any 301 or 302 redirect will be automatically followed.
Any 4xx or 5xx response is considered an error.
Errors can be processed using the error pin - the orange pin at the bottom right of the block. That pin will receive the error message from which you can build logic to handle the error.
Warning
If you do not explicitly handle the error, the block will raise an error if the web service call failed, and will propogate the error back to the caller. This is often the exact behaviour you want - but in some cases where you expect errors as part of the flow, you should explicitly handle it.
Custom Pre-Processing
Sometimes you need to do more complex transformations on your inputs before calling the actual web service. You can write javascript code to manipulate data before sending it to the web service. You can add/modify headers, query strings and change the entire url/payload in your script. This lets you provide a simplified block and inputs to the user.
Some examples of things you might want to do:
- Escape some text before adding to the end of a url
- Allow inputs to be datetime objects and convert them to ISO 8601 strings before sending to the API
- Adding items into a list and then stringifying it before sending as a payload
To make use of a custom pre-processing script, edit the web service method and click the ‘PreProcess’ tab. In the text box there, you can add some custom javascript code. You can use ES6 javascript to write the code.
Your script has access to the following objects that you can use to read the existing configuration and inputs and supply new configuration:
| Variable | Description |
|---|---|
| inputs | A dictionary of inputs that were passed to the block. The dictionary keys are pin names. Values are the actual values fed to the block during execution. You can read values from here and transform them in some way before sending to the web service. |
| request | The request object. Gives you access to the details configured for the method including the url, query string and headers |
| runtime | The runtime object. Has methods that let you override the request configuration details. Use this to override any configured data. |
| auth | A dictionary that contains any authentication information associated with the request and account profile. The following keys are available: * accessToken - If the API uses OAuth 2, this will be the latest bearer token that was generated * apiKey - If the API uses custom authentication, this is the custom api key that was configured for the web service account. * username - If BASIC authentication was specified, this is the username that was given for the account profile that’s being used in the execution * password - If BASIC authentication was specified, this is the password that was given for the account profile that’s being used in the execution |
Example 1
This example reads an two inputs - From and To and adds them as ISO8601 datetimes in the query string as parameters called fromDate and toDate
let fromDate = runtime.parseDate(inputs['From']);
let toDate = runtime.parseDate(inputs['To']);
runtime.setQuery({fromDate,toDate});
Example 2
This example takes all input pins except ‘Password’ and puts them into a JSON dictionary and sets this as the payload of the request.
let payload = {};
for(let k in inputs) {
    if (k === 'Password') continue;
    payload[k] = inputs[k];
}
runtime.setBody(JSON.stringify(payload));
Input Pin Configuration
When designing your method, you should think about what inputs you expect to get from the user when they use the block corresponding to your web service method. By default, if you use any ref:placeholders <wsvars> in your configuration, those will be made available as input pins in the block.
However you sometimes may want to provide additional input pins (when you are using a custom preprocessing script).
From the method configuration dialog, in the ‘Input Pin Configuration’ tab - you can specify additional input pins.
Click the to add a new pin. You need to give it an id and a label.
The id will be the internal name used to access the pin in your script. The label is what the user sees.
In addition, you can allow the user to add multiple input pins of her choice when using the block. Check off the ‘Allow additional pins’ option to let the user add their own pins.
You can access all the pins (both - those defined by you and those added by the user) in your preprocessing script through the inputs variable.
Registering Accounts
All web services get executed in the context of an account. The account holds the credentials required to call the web service and fills in the credentials at the points specified by the web service method.
You can add accounts in two ways:
- From the web service configuration page, in the accounts section, you can click the to add a new account.
- Directly from Lucy, when you add a block, in the account list, you can choose Add New to add a new account right from Lucy. The account that you add gets added to the master list of accounts.
You can delete an account by clicking the  icon next to it.
Warning
Deleting accounts that are used in Lucy models will result in errors so make sure the account is not used by your models.
When registering a new account, you will be asked to provide a name for the account. The other details to fill will depend on the authentication type. In the case of OAuth, you will be asked to authorize the account. You will be taken to the application’s authorization screen in a tab, and then back to the accounts page once authorization is done.
Tip
If your web service doesn’t require credentials, you can call it without explicitly specifying an account.
User Agents
Lucy sets the User-Agent for every request to Lucy <ModelName>.
Model name will change based on the name of the model calling the API.
If the service is running without a model name set (for example, you created a new model and are testing it without saving) then the User Agent will be simply ‘Lucy Model’.
SSL
Lucy supports TLS 1.0, 1.1 and 1.2 when calling web services.
Using connectors
Once you have setup your web service and methods, you can start using it in your action sequence. In the block panel a new category will appear representing your web service. You can expand it to find blocks representing each method that you defined.
When you drop the block into the staging area you will see that each variable that you used will appear as an input (except the reserved variables that are automatically made available). The account to use is also available as an input pin.
If you configured any custom output processing, those pins will show up as outputs of the block.
In the property panel you can select the account to use for executing the service. Either pick one from the list or add a new one.
Tip
If you want to get fancy, the account is also available as an input pin so you can feed in the account name from somewhere else. So you could build logic to decide which account to use based on some condition in your model.
Javascript objects
The following javascript objects are available for preprocessing and/or postprocessing scripts for web services.
request
This object is only available for pre-processing scripts in web services. The object contains the following members:
| Member | Type | Description |
| headers | dictionary | A dictionary of header name/value pairs that have been configured. |
| query | dictionary | A dictionary of query string names and values. |
| body | string | The raw payload that is ready to be sent. |
| url | string | The url of the web service |
runtime
This object lets you manipulate requests by changing the payload/query string/headers. The object contains the following members:
| Member | Type | Description | Availability |
| setHeaders(object) | function | This function lets you set the final set of headers that will be sent with the request. Any existing headers that were configured will be removed. Its recommended you use request.headers to read the original set of headers, then manipulate that dictionary and set it again using this function. |
PreProcessing Scripts |
| setQuery(object) | function | This function lets you set the final query string parameters that will be sent with the request. Any existing query strings that were configured will be removed. Its recommended you use request.query to read the original key/value pairs, then manipulate that dictionary and set it again using this function. |
PreProcessing Scripts |
| setBody(string) | function | Sets the raw payload that is sent as the body of the request (obviously not relevant for GET requests). The most typical use case is to build an object in javascript and then call runtime.setBody(JSON.stringify(obj)) |
PreProcessing Scripts |
| setUrl(string) | function | Override the actual web service url with a new one. This is useful if you need to specially craft segments of the url based on inputs | PreProcessing Scripts |
| log(string) | function | Used to log text to the LucyEngine console. | PreProcessing and PostProcessing |
| parseDate(object-or-string) | function | This is a useful helper function that will take an input and parse it into a valid datetime object. The input could be a string representation of a date or a datetime object. | PreProcessing and PostProcessing |
| setError(string,code) | function | Use this to signal an error in the web service call. The first parameter is an error message string. The second is an http status code. | PreProcessing and PostProcessing |
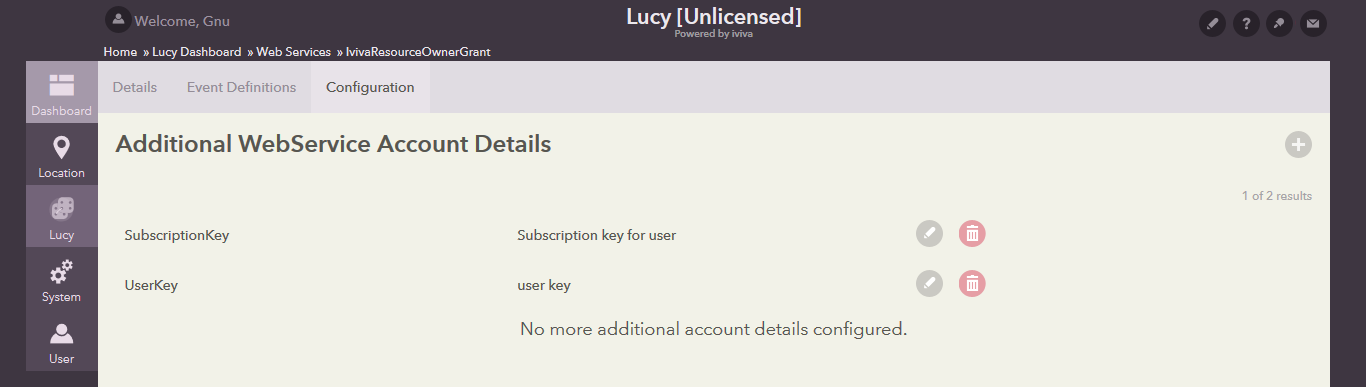
Additional WebService Configuration
This feature allows you to specify some additional set of configuration for a webservice and values for each configuration can be provided per webservice account.
A simple usecase where this could be helpful is, when using webservices that would require you to provide an additional access key like a Subscription Key, along with your usual Access Token. Now, we could have an additional pin in webservice block and use that in webservice method. But, you would have to pass the value into the Lucy action, which might not be secure. So instead, you could simply create a configuration in your webservice, provide it with a value when creating an account or updating an existing one and use that in your webservice method.
Lets look at how to setup additional configuration as follows,
- Create Additional Configuration
- Update Additional Configuration
- Delete Additional Configuration
- Providing Value for Additional Configuration
- Using the Additional Configuration
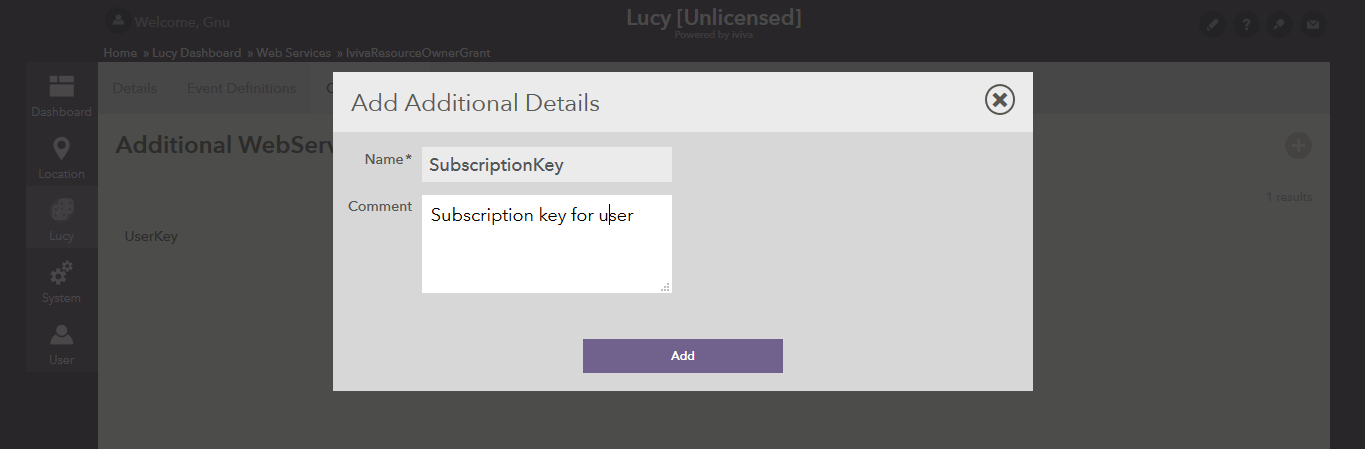
Create Additional Configuration
The following steps illustrate how to create additional configuration,
- Goto your webservice
- Click on Configuration tab
- Click on icon, to add a new configuration
- In Add Additional Configuration dialog, provide a Name & an optional Comment for the configuration
- Click on Add
Illustration
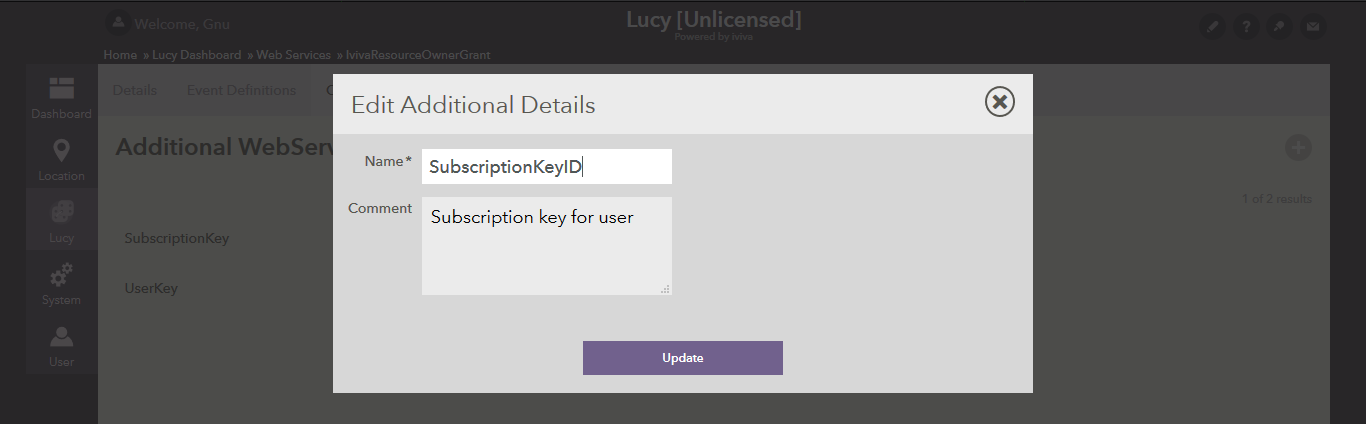
Update Additional Configuration
The following steps illustrate how to update additional configuration,
- Goto your webservice
- Click on Configuration tab
- Click on icon, to edit a configuration
- In Edit Additional Configuration dialog, provide a Name & an optional Comment for the configuration
- Click on Update
Illustration
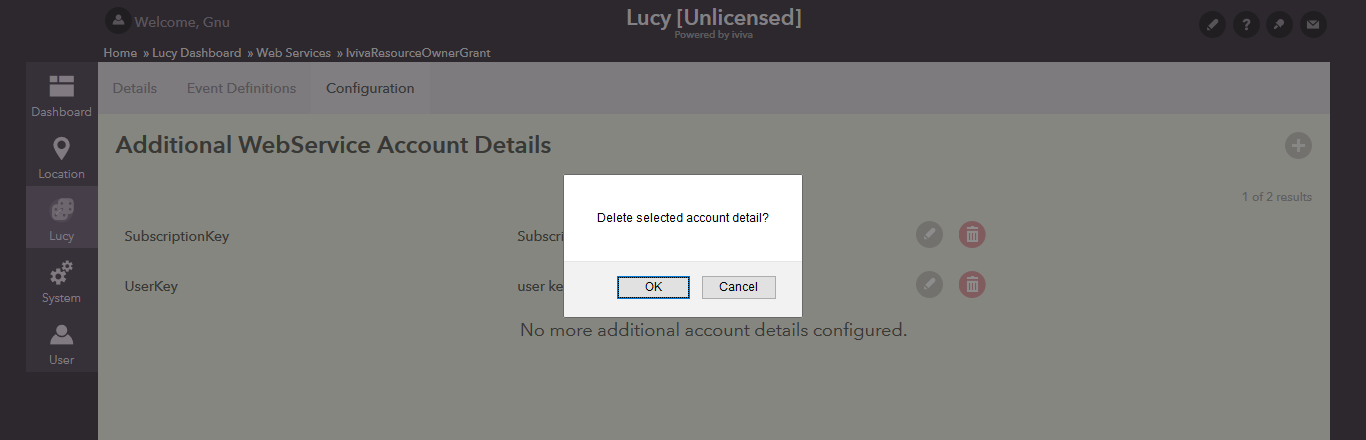
Delete Additional Configuration
The following steps illustrate how to update additional configuration,
- Goto your webservice
- Click on Configuration tab
- Click on icon, to delete a configuration
- To confirm, click on Ok
- Click on Cancel to cancel
Illustration
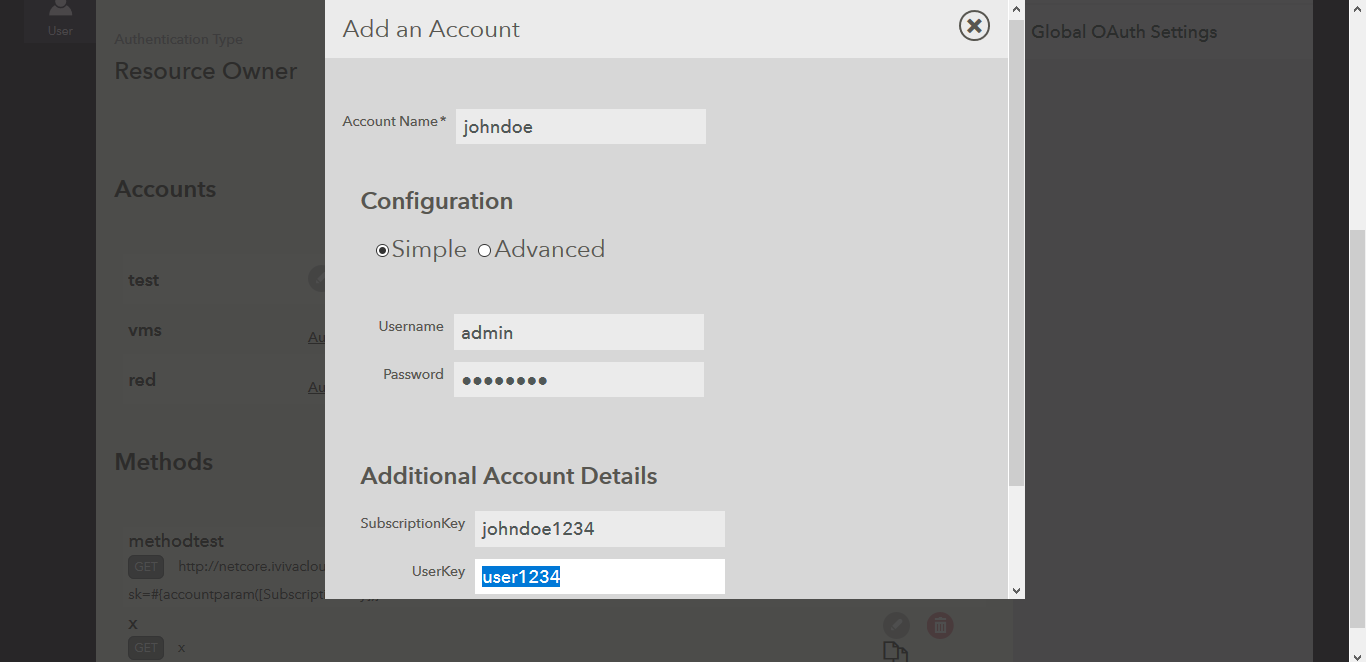
Providing Value for Additional Configuration
Now we can provide values for a configuration the following ways,
- Adding an account from web service dashboard
- Goto your webservice
- Click on icon in Accounts section to add on account
- In Add Account dialog, goto Additional Account Details section and fill the values for your additional configuration
- Click on Add
Illustration
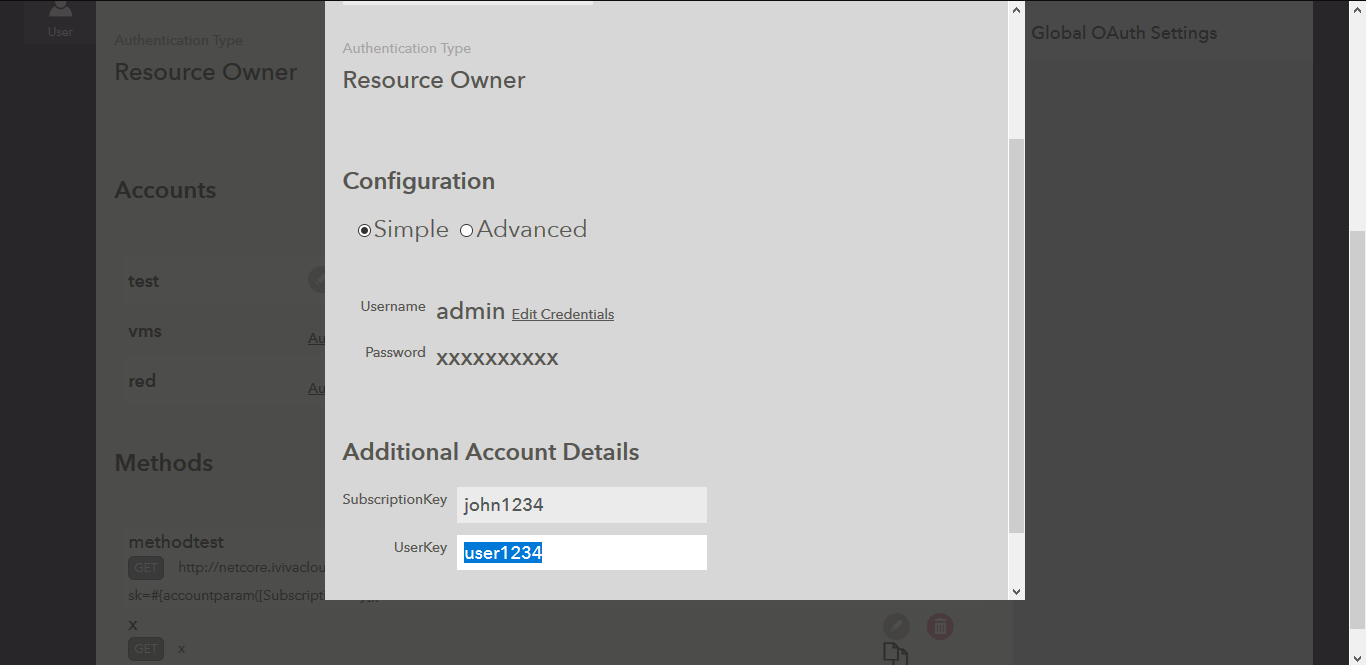
- Updating an account from web service dashboard
- Goto your webservice
- Click on icon next to your account, in Accounts section to edit
- In Edit Account dialog, goto Additional Account Details section and fill the values for your additional configuration
- Click on Save
Illustration
- Adding an account from web service block in lucy
- Goto your lucy action
- Click on the webservice method block
3. In the block’s property window, click on Account field under Inputs section & choose Add New+ 3. In the dialog, goto Additional Account Details section and fill the values for your additional configuration 4. Click on Register Account
Illustration

Using the Additional Configuration
To use the additional configuration we just registered, we can use the following function exposed via iviva Expression.
Syntax
#{accountparam([<configuration_name>]}
Example
#{accountparam([SubscriptionKey]}
Note
If the configuration doesn’t exist, then the result would be simply be empty.
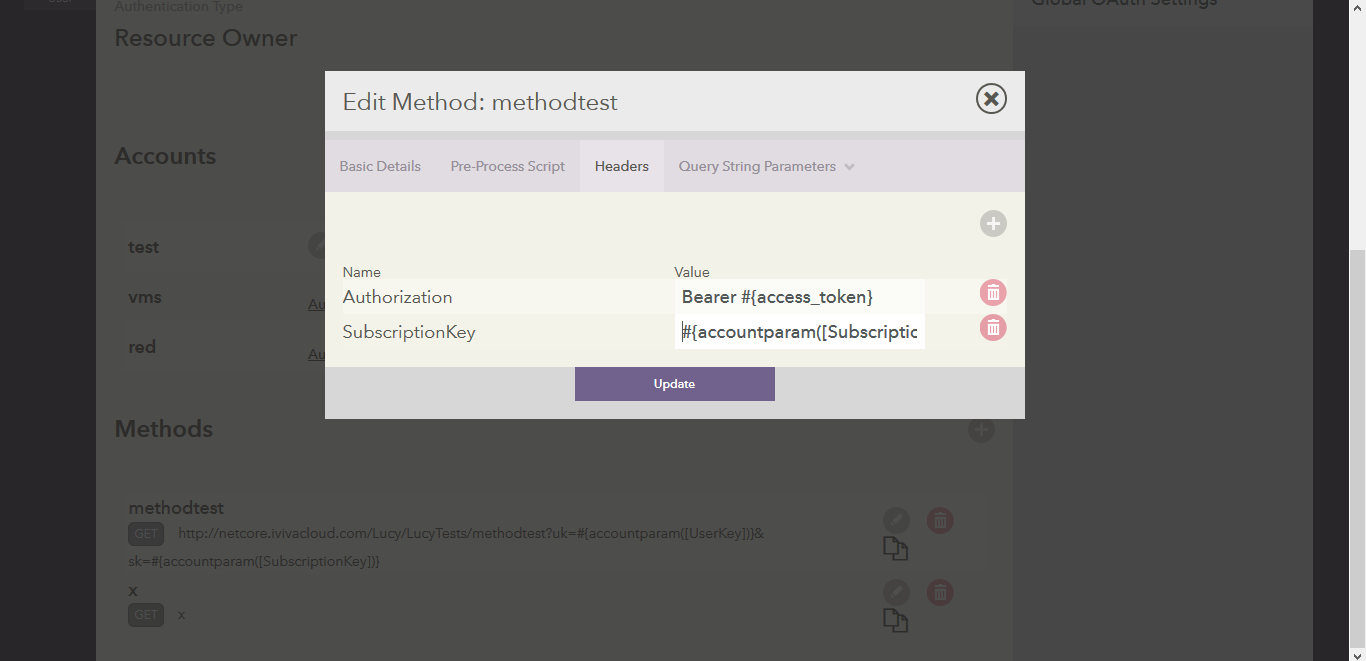
For example, you can pass this SubscriptionKey configuration in the header as follows,
- Goto your webservice
- Click on icon, next to method in Methods section
- In Edit Method dialog, goto Headers tab
- Click on icon to add a new header, provide a name like SubscriptionKey and click on Add
- Now, in the Value column of SubscriptionKey, enter #{accountparam([SubscriptionKey]}
- Click on Update
On executing this method from Lucy, any SubscriptionKey configured for that particular webservice account is passed to the API
Illustration